It will take you 2-3 days to install kitchen cabinets. However, several factors may either shorten or increase this time frame.
Whether it’s replacing kitchen cabinets or reconfiguring them, the common question I have heard is, “how long does it take to install kitchen cabinets?”
This issue haunts many homeowners. Kitchen cabinets come in handy during weddings, holidays, and graduation.
This may be the leading cause of the increased kitchen cabinet market globally. According to a study, the global kitchen market will have a value of USD 160 billion in 2025.
JUMP TO: 3-DAY INSTALLATION PROCESS | FACTORS AFFECTING THE DURATION OF INSTALLATION

Source: mordorintelligence.com
According to Globe News Wire, the demand for kitchen cabinets is also projected to grow by US$7.7 billion.
This article will help answer the question on the duration of fixing a kitchen cabinet, plus the factors that affect that duration.
But first,
Is Installing Kitchen Cabinets Difficult?
Source:Istock.com
I did my research, and there seems to be a consensus that, installing kitchen cabinets is not brain surgery.
Does that mean anyone can wake up and install kitchen cabinets? Of course not.
The level of ease depends on whether you are a professional or an amateur.
For a professional woodworker, cabinet installation is a walk in the park, provided they have the right tools. That may not necessarily be the case for DIYs who are not professionals.
I repeat, installing kitchen cabinets is not hard. But there’s a catch,
If you are a DIY person and doing your kitchen renovation, you will need to consider the following factors, which I consider the bare minimum requirements:
- Kitchen cabinets tend to be bulky and heavy; therefore, you will require a helping hand
- You need to know the prerequisite tools to use
- Know your floor thickness
- You need to be good with the measuring tape
Having said that, let me now dive into the real thing; the installation process.
A 3-Day Kitchen Cabinets Installation Process
Day 1: Prepare Your Kitchen and Cabinets for Installation
When you install new cabinets, it’s better to do it after completing the plumbing work, making electrical outlets, and wiring. For the replacement of old cabinets, first, remove them carefully to avoid damaging the wall.
Find the Highest Spot on the Floor
Most older homes have uneven floors.
You might be asking, so why should I find the highest point?
Locating the highest point is crucial because it is the reference point for all the other measurements. A level and an 8′-long 2×4 board are all you need for this process.
Mark the Top of Your Base Cabinets
Source: Oldhouseonline.com
Most base cabinets have a height of 34 ½ inches. Measure this from the highest point on the floor, then mark it using a pencil. Draw a leveled line and, if possible, dry-fit the base cabinet.
Fitting the base cabinet will also help you make additional marks to draw the leveled line easily.
Mark the Bottom of Your Wall Cabinets
The standard bottom distance between the base and wall cabinets is 18 inches. However, some variances go up to 20 inches.
But why 18 inches?
This distance provides an ideal balance for working on the countertop comfortably and easily reach the top shelves.
The distance is also comfortable for many average-height people.
Locate and Mark Studs
Improperly secured cabinets pose the risk of detachment and causing accidents. For your cabinet to be genuinely secure, the fasteners must go through the structural wood in the wall.
Important note: Drywall alone lacks the needed strength to secure your kitchen cabinet firmly.
Studs are essential in providing a secure hold for your cabinets. You can use a stud finder to locate the studs on your wall.
What then after that?
You will need to screw your cabinets into these studs.
Prepare Your Cabinets
When ordering cabinets, you can opt for either Ready to Assemble (RTA) or the assembled ones. Each of these calls for a different preparation.
For RTAs, the first step is to assemble them. On the connection groves, apply all-purpose wood glue to create a sturdy connection between the connected parts. Moreover, the wood glue helps produce an overall durable construction.
What about the small spaces that at times occur as you do assembling?
Fillers will help you fill up such spaces between the cabinet parts. Cut the fillers into the required sizes, then attach them appropriately by screwing them.
If you ordered the already assembled cabinets, you might want to detach the doors and the drawers first. It’s more convenient to install the cabinets without the doors the attach them at the end.
Also Read: How to clean Kitchen Cabinets? 8 Methods Explained
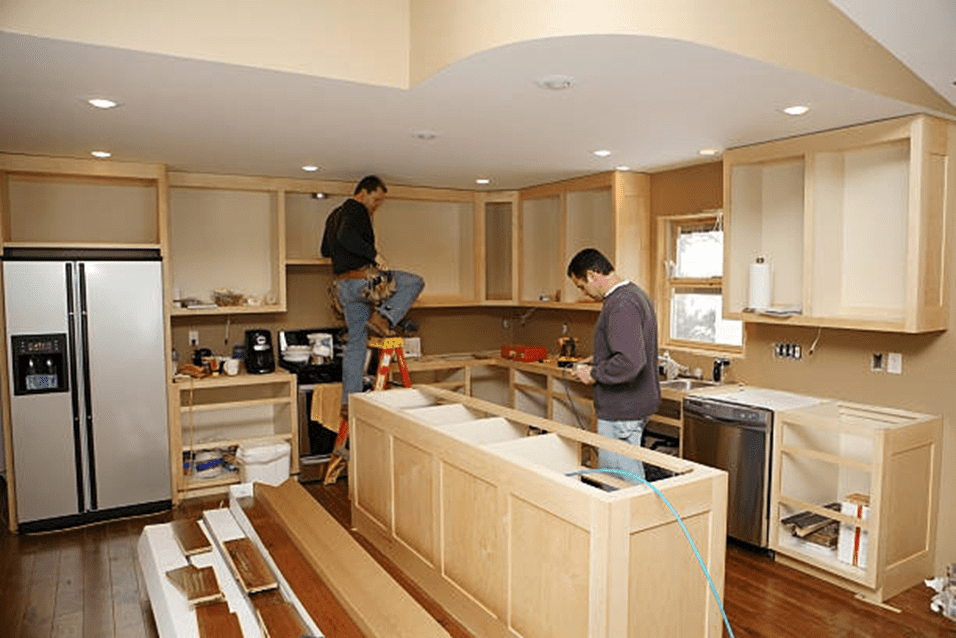
Day 2: Install the Upper Wall Cabinets
You are done preparing your cabinets; the next step is fixing them on the wall. Always start with the wall cabinets to avoid leaning on the base cabinets as you install cabinets.
Start by Installing Corner Cabinets
This step applies only if a corner wall cabinet is part of your setup. You will need a helping hand.
So, how do you go about it?
Begin by drilling holes into the cabinet; ensure they go through the wall studs. Using two screws that are long enough, screw the cabinet to the wall. The screws should be able to go through the studs by 1 ½ inch.
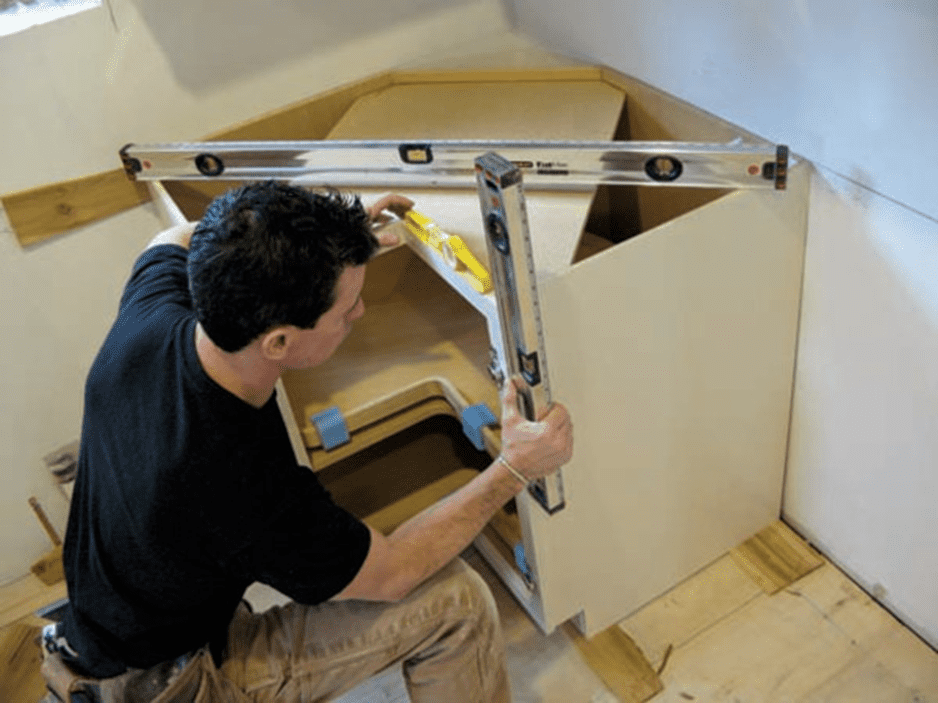
Important tip: Always check the top of your cabinets for level and the front edge for plumb during cabinet installation.
Install the Adjacent Cabinets
To install the upper cabinets, you can opt to screw through the cabinet’s back or use a French cleat. However, these two are applicable in different situations.
So, when do you use a French cleat?
A French cleat comes in handy if you are working alone. It helps you to hang the cabinets on the wall as you work on them. You will also require a French cleat to help you leave space between the ceiling and your cabinet.
However, if you have a helping hand, you can easily screw through the cabinets’ back into the studs. Make use of enough cabinet screws to secure your cabinets.
Installing Base Cabinets
Cabinet installation is relatively easier since you don’t need to hold them in the air. However, you need to observe several guidelines.
First, it’s essential to understand the standard measurements of a kitchen cabinet. The table below shows you the standard kitchen base cabinet dimensions:
| Cabinet Area | Measurements (in inches) |
| Height, without countertop | 34 ½ |
| Height, with countertop | 35-36 |
| Depth without countertop | 24 |
| Depth, with countertop | 25-26 |
| Standard widths | 12, 18, 24, 30, 33, 36, 48 |
Other important things to remember include:
- before cabinet installation, always mockup the layout on the wall
- shim the studs appropriately so that the cabinets are well aligned with each other
- ensure the cabinet fronts line up properly
- use tiger clamps in clamping the cabinets together
- don’t forget to use a level to check the tops of the front
Tip: A wedge shim will help you to raise any low cabinet slightly to make it level with the rest.
Day 3: The Last Touches
You have finished your cabinet installation: the upper, corner, and base. All that is remaining is to carry out a few final touches, and then you are done.
Here are two final major touches you need to do.
Add Filler Strips and Trim
Sometimes there will be a gap between your cabinets and the wall.
So, how do you fill up these gaps?
Several home improvement sites give different solutions. Some recommend that you use spacers and trim to fill the gap.
On the other hand, some feel that a paintable caulk is a better option.
But I also discovered that caulk eventually cracks unless you back it up. As such, it may not be the best option for this task.
There, however, seems to be a consensus that cabinet filler strips are the most effective. But they may not be the simplest to fix.
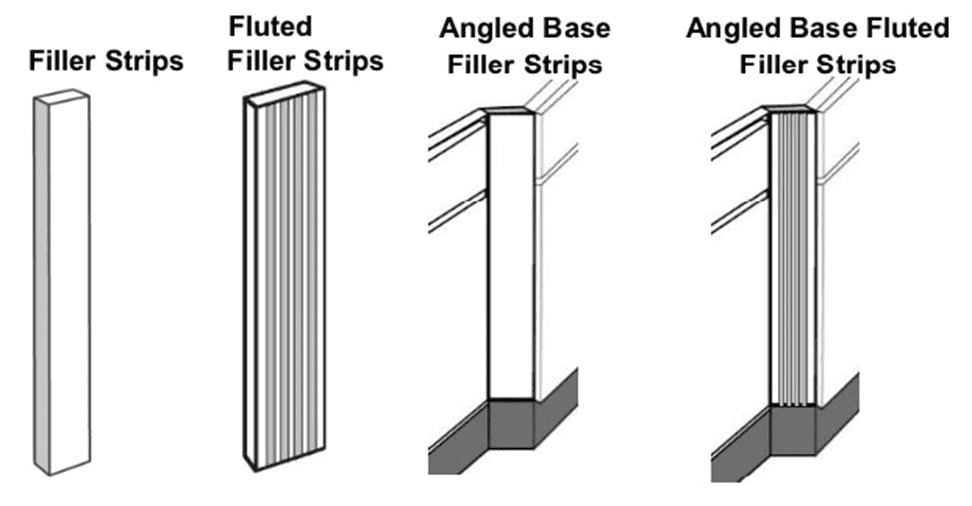
Source: Highlands design
The walls are hardly even. As such, you will need to measure the strips and then cut them to size to fit well.
Install Doors and Drawers
You have completed installing and securing your cabinets on the wall. It’s now time to fix back the drawers and the doors.
If your cabinets came assembled, you would want to refer to any markings you made as you detached the doors. This will ensure you match the doors and the drawers to their respective cabinets.
Your RTA cabinets already have clear markings. Simply attach each door and drawer to its appropriate cabinet.
What next?
It’s important to check again if everything is leveled and make any adjustments that may be needed.
What Factors Affect the Duration of Installing Kitchen Cabinets?
The Size of Your Kitchen
A large kitchen has more storage space than a smaller one, which translates into more kitchen cabinets.
If you install cabinets in a large kitchen, it will; therefore, take a longer time than in a small kitchen. However, this remains so if other factors such as workforce and complexity remain constant.
How Straight Are Your Walls and Floor
This looks a bit ridiculous, doesn’t it?
However, the walls and floors aren’t level in some older homes. In fact, you may be hard-pressed to get any clean 90-degree angle anywhere.
Uneven walls may be because of any of the following:
- installation of framing slightly on an angle
- warping in the wood
- the tendency of older homes to settle on their foundations
- improper application of plaster
If your walls are uneven, you will need to adjust your kitchen cabinets to fit flush with all surfaces. This process requires expertise and time. Consequently, it will lengthen the time to install cabinets.
Again, leveling uneven walls is mandatory if you want your countertops to be level.
TIP: Always plan to have your imperfect walls rectified long before you begin the kitchen cabinet installation process. This helps to reduce the installation time.
Requests for Changes
The installation process becomes slower if you make any changes midway through the installation.
A change in design, for example, will necessitate the reordering of new kitchen cabinet materials.
It may also mean that you have to redesign other kitchen aspects.
Other times, change becomes inevitable if the hardware you acquired isn’t the right one. Consequently, you have to order the right hardware.
In simple terms, any request for change, even a minor one, will have a domino effect.
Availability of Workforce
Manpower is key when installing your kitchen cabinets. It’s not rocket science that the higher the number of workers, the easier the work and the less time it will take.
If you choose to do it all on your own, be ready to take a longer time. However, you can lessen the time by hiring some more hands to help you.
Manpower also has to do with expertise. A professional person will take less time than a novice. Consequently, if you plan to get someone to do it for you, enlist the services of a professional. That way, you will significantly reduce the time of installation.
Important Note: A professional will not only complete the task within the shortest time possible, but they will also deliver quality work.
The Complexity and Scope of the Work
The demand for unique and custom cabinets keeps soaring. Cabinet designs and styles vary from custom, semi-custom, and stock.
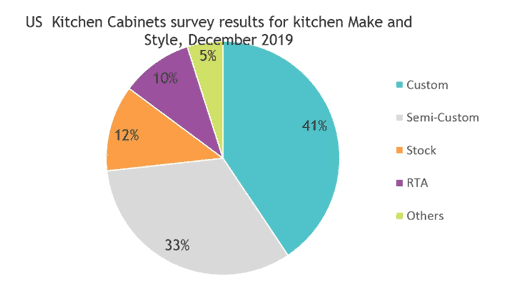
Source: Mordor Intelligence
So, what’s my point?
If your design is largely complex, more work is needed. Consequently, it translates into a longer time to install the cabinets.
You make work easier if you make all the parts in advance. Ensure you measure them appropriately to fit the kitchen design of your choice. Only after that, you should begin the kitchen cabinet installation process.
For complex cabinets, you can also opt to engage a professional. A professional is well equipped with the necessary skills to fit and install the cabinets within a record time.
Budget
Last but not least, what is your budget?
Your budget has the power to rule and determine how much time your project will take.
The table below shows the estimated costs of different kitchen designs.
| Requirement | Stock | Semi-custom | Custom |
| Materials & Hardware | $200 | $400 | $750 |
| Labor | $100 | $250 | $450 |
| Total | $300 | $650 | $1200 |
Here is why a budget is important,
With an abundant budget, you can hire more workforce. Consequently, you will get speedy delivery of materials and quick project completion.
On the flip side, you will be limited in workforce and materials if you have a tight budget. Consequently, your project will take longer.
DIY vs. Hiring a Cabinet Installation Pro
I think you’ll agree with me when I say that deciding whether to go the DIY way or hire a professional is crucial.
Each of these two paths has its pros and cons. The bottom line, however, is that you would love kitchen cabinets that are in line with your desired design and will last for a long time.
In the following table, I have compared a few factors that might help you make the right decision.
| Parameters | DIY | Installation Pro |
| Installation cost | Cheaper | Quite expensive |
| Quality | It May not be of very high-quality | High-quality |
| Time | May take longer | Takes shorter time |
| Ability | Lacks crucial skills and experience | Highly skilled |
| Safety | Could be risky | Safer |
| Cabinet design | Mainly stock cabinets | All designs, including custom cabinetry |
| Satisfaction | Quite satisfying since you work at your pace and plan | Less satisfying since you aren’t directly involved |

![How Much Does It Cost to Build a Kitchen Island? [Custom Made+DIY]](https://houseadorable.com/wp-content/uploads/2022/03/cost-of-kitchen-island.jpg "How Much Does It Cost to Build a Kitchen Island? [Custom Made+DIY]")
![How Much Weight Can Kitchen Cabinets Hold? [Explained]](https://houseadorable.com/wp-content/uploads/2022/12/img_63ab44a997e44.png "How Much Weight Can Kitchen Cabinets Hold? [Explained]")
![How to Choose Kitchen Cabinets [9 Important Tips Included]](https://houseadorable.com/wp-content/uploads/2022/10/kitchen.jpg "How to Choose Kitchen Cabinets [9 Important Tips Included]")

![Granite Vs. Marble Vs. Quartz Countertops [12 Differences+Pros & Cons]](https://houseadorable.com/wp-content/uploads/2022/03/quartz-marble.jpg "Granite Vs. Marble Vs. Quartz Countertops [12 Differences+Pros & Cons]")
![What Is Kitchen Cabinet Refacing? [Pros and Cons + Cost Analysis]](https://houseadorable.com/wp-content/uploads/2022/04/Refacing.jpg "What Is Kitchen Cabinet Refacing? [Pros and Cons + Cost Analysis]")
![Kitchen Cabinet Standard Sizes & Dimensions [A Complete Guide]](https://houseadorable.com/wp-content/uploads/2022/10/kitchen-cabine.jpg "Kitchen Cabinet Standard Sizes & Dimensions [A Complete Guide]")