Your kitchen plumbing consists of gas and water supply lines. Both are necessary for the proper operation of your kitchen. Your kitchen sink’s plumbing could break down if you make a mistake. There is even the possibility of dealing with sewage fumes and damaged slip nuts.
Can you picture your kitchen without a sink or a standard kitchen sink system? Where would you wash your dishes, throw away your trash, or even get a mug of water while you’re cooking?
No, right?
As a result, you must understand how your kitchen sink drains plumbing works and what to do if it’s not working.
Read through this article to learn how to maintain and install your kitchen sink.
So, How Does a Sink Drain Work?
To make the task easier, you can watch this video to know precisely how a sink drain works. The video demonstrates the detailed anatomy of the kitchen sink plumbing. Each system is also explained in detail.
What Does Your Kitchen Sink Consist Of?
The market offers a wide variety of kitchen sinks. Most of them are made of enamel-coated cast iron, stainless steel, composites, and solid surfaces. Which consists of many parts, some of which are mentioned below:
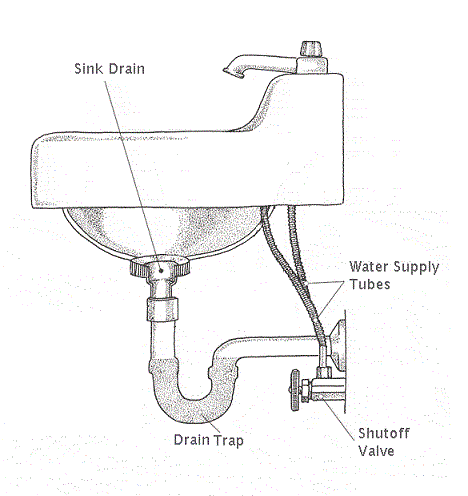
Water Supply Line:
Just below your kitchen sink, you can see that two pipes are running, these are,
- The hot water supply pipes
- The cold water supply pipes
The cold water should always be on the right side of the faucet, while the hot water should always be on the left. This North American industry standard applies to both single and dual lever faucets.
Each one of these pipes is connected with valves. This can be turned clockwise and anti-clockwise to turn on and off the waterline.

Source: Proudfoot-services.com
Gas Supply Pipe:
Located below the sink, inside the sinks cabinet. Mounted on the walls or beneath the flooring to manage the natural gas flow.
Waste Disposal Pipe and Drain Trap:
The system for removing wastewater from the sink and preventing it from clogging is done by a disposal pipe. It is possible to stop sewer gases from entering the house with a J-shaped pipe under the sink. The most popular sink trap is known as a P-trap.
Note: Kitchen drains are 1 1/2 inches in diameter. As opposed to the 1 1/4-inch pipes found in bathroom sinks, so be sure you get the proper size. One can find a kitchen drain outlet of 2 inches. If this is the case, adaptor fittings for a 1 1/2 drain kit to a 2-inch outlet pipe are available.
Watch this video to know how you can connect these water lines under your sink.
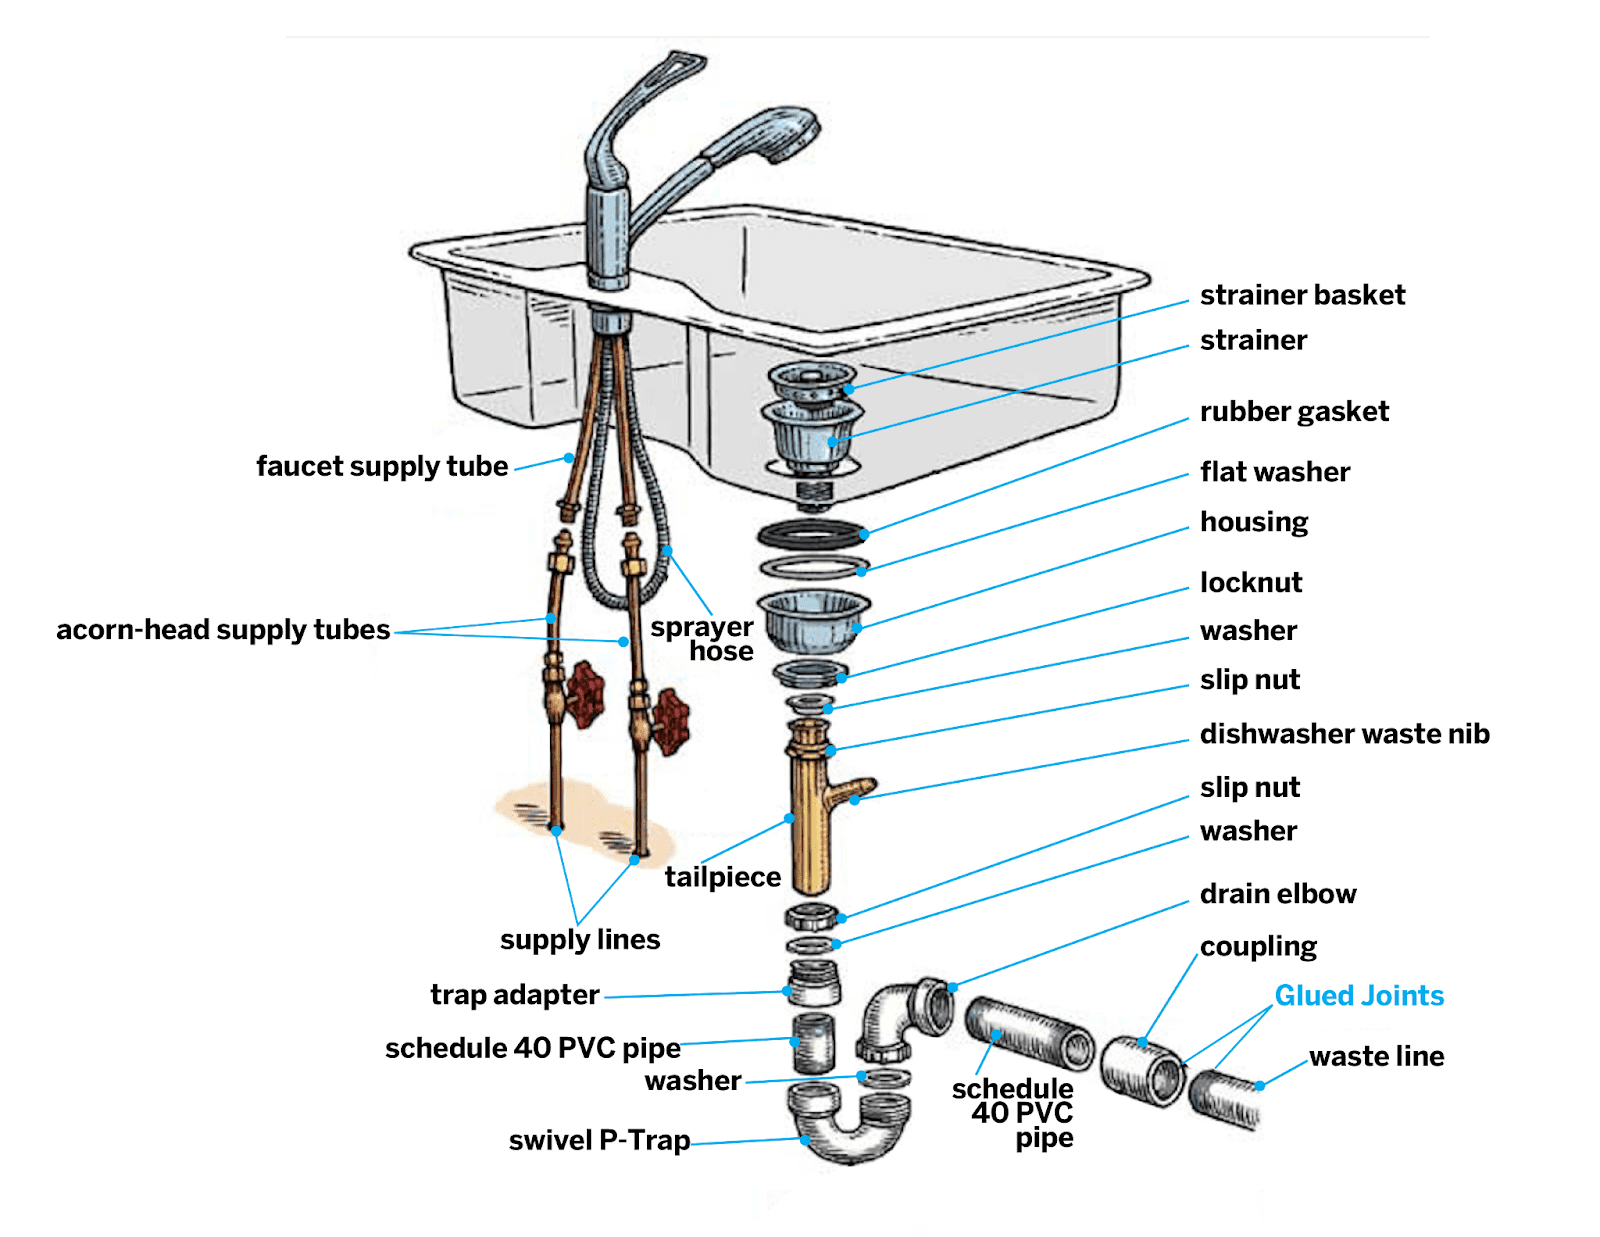
Strainer:
A strainer is fitted into a strainer body inserted down through the sinkhole. Kitchen sinks are sealed with plumber’s putty. Drain tubing and the strainer body are connected to the drain’s tailpiece underneath the sink.
The usual sink drain opening size is 3-½ inches, but some drain openings are 4 inches. This deep cup strainer can handle drain openings ranging from 3-1/2″ to 4″ in diameter.

Source: Indiamart.com
Additional parts:
- A rubber gasket, metal washer, and large locknut or retainer – Pieces that bind and tighten the body with the sink.
- Tailpiece – a threaded coupling attached to the strainer body.
- Escutcheon – Located at the wall or the back of the connected, hides the connector and the nipple.
- Shutoff valve – Water flow can be controlled, pressure can be managed, and the water can be turned completely off if necessary using this valve.
- Dishwasher supply
I get why you might think you don’t need to know about all of this, but learning the basics is always a bonus for understanding how anything works.
The image below shows the different parts of a kitchen sink:
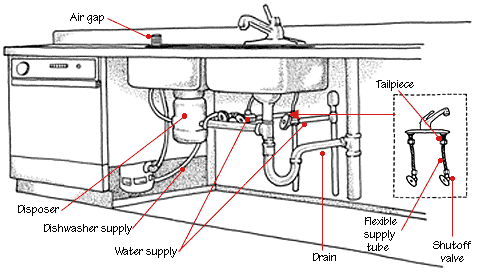
As you can see in the image above, there are several pipes connected to the sink and the drainage system of your house.
In brief, the sink is connected to the water supply system, the gas pipe, and the drain. Additionally, a disposer is connected to the dishwasher supply for the garbage disposal of different kinds of waste.
This consists of a tailpiece, which is then connected with a supply tube, and the shutoff valve, which can be opened and closed when you want.
Here is the detailed illustration of the sink done by Gregory Nemec:
Fun Fact: The phrase ‘kitchen sink’ dates back to the early 1900s, with the first print citation appearing in the Syracuse Herald in 1918. During World War II, the saying “everything except the kitchen sink” gained widespread since the enemy was believed to be thrown at.
How Do You Install a Sink (Plumbing Included)?
Follow these steps to install your sink:
Step 1: Measure the height of your drain
Yes, this matters! If you want to fit the pipe to the kitchen sink drain properly, you’ll need to lower the height of your drain to the wall.
Step 2: Prevent clogging
To do so, keep in mind that you should leave enough space for the drain to run out of your pipe while fitting the various pipes mentioned above.
This would help in preventing your sink from unnecessary clogs in the future. Better be careful beforehand, so you don’t need to waste your time and money on removing the clog!

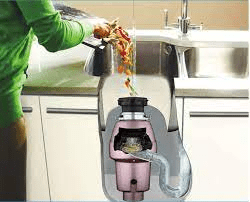
Step 3: Consider waste/garbage disposal (Waste pipe)
The garbage disposal uses an electric circuit to flush and separate food waste and other solid wastes from entering the sink drain pipes and transferring them to the trash can.
Again, this helps in the maintenance and cleanliness of your sink.
Step 4: Connect the tailpiece and the waste pipe
The strainer is connected to the tailpiece by a pipe. The tailpiece can be attached to the strainer with a slip nut, and the curved end of the waste pipe can be connected to the garbage disposal can. Continue with the straight end of the pipe until you reach the tailpiece.
Finally, fix it to the PVC tube after fitting it and removing the excess.
Step 5: Check for any leaks
This is the most crucial part of the installation – checking if you have done all the processes correctly! Ensure that there are no faulty connections or pipes or any other system. Try using the sink and look for any leaks.
Patch the space with a plumber’s putty.
If there are any leaks or other issues, it would be a good idea to call a plumber and do it with the help of a professional.
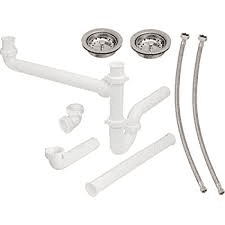
Kitchen Sink Plumbing Kit:
This can be a set of tools that come in handy while fixing or working with your kitchen sink. The kit consists of The bowl plumbing kits, discharge connector, and sink drains.
Things to Keep in Mind While Buying Your Perfect Kit:
- Cost of the kit, as every kit price would differ.
- What all tools the kit offers, look for the ones which have the most important ones for you.
- The size of the kit, make sure it fits properly.
- Look for the materials necessary for your sink, this would depend on what you use the sink for and the maintenance of it.
Lastly, go for the one which suits your kitchen! If needed, take help from a professional in deciding so that you don’t face any unnecessary issues later.
Did you know who built the first kitchen sink?
Alfred M. Moen. He was inspired to build a better kitchen sink faucet system after nearly burning his hands while washing them in the sink. Moen created a single-handle faucet that could combine hot and cold water before leaving the fixture so that the temperature would be normal.
Common Kitchen Sink Plumbing Challenges You May Face:
Clogging
Usually, the left-out food particles and some solid waste accumulate in your kitchen drain pipes, resulting in clogging. Due to this, you may smell odors and face issues with the easy flow of water from the sink.
What can you do to solve this:
First, try to use a plunger in the sink. Ensure that the sink has some water before plunging. This will help push the water down through the pipe so that the accumulated waste can be drained out.
If this does not work, you will have to check the main pipelines and the sink drain. Look below the sink; you will find several pipes mentioned above. But, search for the P-trap, which is linked o the rain of the sink. Once you see this, place a bucket under the sink trap and try to slip nuts on either side of it.
This will clear out the accumulated waste through the drain pipes. If it doesn’t, you should most call a plumber and ask for their suggestions.
Low Water Pressure
If you start to notice problems with the water pressure coming out of one of your faucets, you’re likely dealing with a blocked aerator.
The aerator is a small circular grate fixed to the opening of your faucet. The aerator can be blocked by minerals moving with the water through your faucet, which could lead to a decrease in the water pressure levels of your sink.
A brush can easily be used to clean it. If this does not work, you might have to check the sink’s pipings connected to the faucet.
Leaky Faucet
A worn washer is a common cause of leaking faucets, as it wears down due to the constant friction created by the water being forced into the valve seat.
The cause of this problem could be a rusted valve seat in the compression unit connecting the spout to the faucet. O-ring seals wear out most commonly around the base of the faucet if it leaks.
What Is the Price of Installing a Kitchen Sink?
Angi says that it costs around $100 to $1250, depending on the size and type of the sink.
It also says that the whole process of installation takes just 4 to 6 hours, with a moderate level of skills in plumbing and the layout of the sink.
What Is Double Kitchen Sink Plumbing?
Upgrading your kitchen sink plumbing to double-sink kitchen plumbing is always a great way to add space and area for dishwashing and cooking.
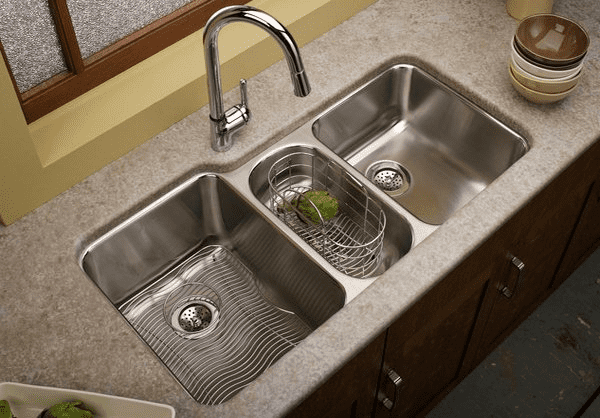
The single sink mentioned above is different as it is a double-basin configuration. Unlike a single sink’s tailpiece connecting directly to the P-trap drain pipe, a double basin sink has a tailpiece that links to a sanitary tee. Which then connects to the P-trap drain.
Apart from the fundamental variation in plumbing configuration, the basic installation technique for single-basin and double-basin sinks is the same.
To Conclude,
Kitchen sink plumbing can be complicated, with all those technical terms and parts involved. However, detailed knowledge of it can be helpful enough to complete.
Every kitchen plumbing work can come with its calls and drawbacks. But you always have an option of calling a plumber, so don’t be scared and keep pushing your plumbing task. Go ahead and do it! You can always revisit this site if you forget or miss something.

![16 Types of Kitchen Faucets Explained [With Pros + Cons]](https://houseadorable.com/wp-content/uploads/2023/02/Roca_griferia_cocina_mencia_negro_DEF_900x505_acf_cropped-1@2x-250x250.jpg "16 Types of Kitchen Faucets Explained [With Pros + Cons]")
![How Much Does It Cost to Build a Kitchen Island? [Custom Made+DIY]](https://houseadorable.com/wp-content/uploads/2022/03/cost-of-kitchen-island.jpg "How Much Does It Cost to Build a Kitchen Island? [Custom Made+DIY]")
![How to Increase Water Pressure In My Kitchen Sink? [Methods Explained]](https://houseadorable.com/wp-content/uploads/2022/12/water2.jpg "How to Increase Water Pressure In My Kitchen Sink? [Methods Explained]")


